Hammond B-3 · Volume 12
Hammond B-3 — Vol 12: Standard-Cabinet Restoration
This volume is the cabinet-restoration bench manual for the Hammond B-3 console — the final volume of Part II (the refurbishment bench manual, Vols 06–12). It treats the four-leg open B-series cabinet as a woodworking and furniture-finishing project: condition assessment; the decision between reviving an existing finish and stripping to bare wood; veneer repair for lifting, blistered, and chipped sections; stripping, grain-filling, staining, and top-coating; and hardware restoration — the music rack, tube-amp and preamp access covers, kick-panel, fasteners, and the organist’s bench. The final section introduces the “keep it original” ethic that governs Part II and cross-references the chopped/portable alternative path in Vols 13–15.
Electrical service of the console interior — the death cap, the B+ power supply, the AO-28 preamp, the tonewheel generator, key contacts, and the vibrato scanner — is the domain of Vols 06–11 and is not revisited here. The B-3 vs C-3 cabinet-family distinction is established in Vol 01 §“Lineage & the tonewheel console family” and cross-referenced here rather than re-derived. Console weight and lifting procedures are in Vol 06 §“Moving & lifting a console.” For the chopped/portable build — the alternative when the original cabinet is beyond saving or portability is the goal — see Vols 13–15. The photographic build gallery for both paths is Vol 16; the reference cheatsheet is Vol 18.
Warn: Cabinet restoration requires access to the console exterior and, for hardware removal, to certain internal panel-retention fasteners. Before removing any panels, covering boards, or sub-assemblies, ensure the instrument is fully powered off, unplugged, and the high-voltage B+ rails are discharged and confirmed at 0 VDC per Vol 06 §“Capacitor-discharge procedure.” Cabinet work is an electrical-off task throughout. This matters particularly when removing the top access panels (amp/preamp covers), which sit directly above the AO-28 chassis.
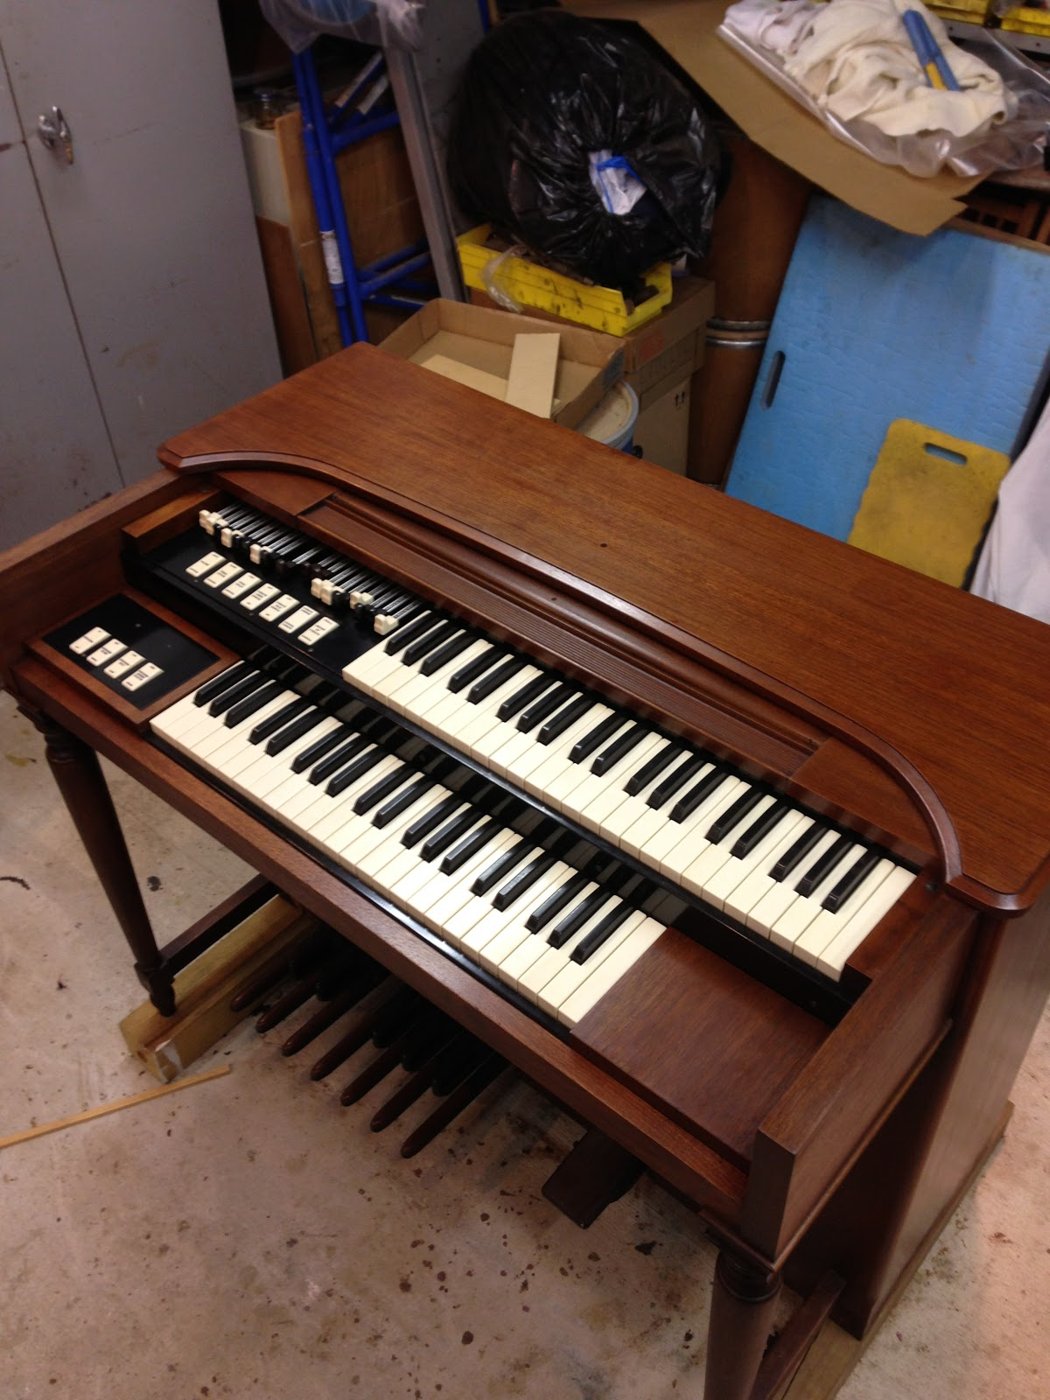
12.1 The B-series cabinet
The B-3 is housed in the open four-leg “bench” console — the cabinet form that defines the B-series from the earliest Model A (1935) through the B-3/C-3 production run (1954–1975) (Vol 01 §“The tonewheel console family”). The defining feature is the open lower console frame: where the C-3 uses a closed “church” cabinet that encases the lower portion and hides the leg structure and organist’s legs from audience view, the B-3 rests openly on four turned legs, and the organist’s bench slides under the rear of the console when not in use.
12.1.1 Panel anatomy
The B-3 console body is a collection of discrete panel and sub-assembly groups — each a separate restoration target. The diagram below identifies the major panels in front-elevation view.
The panel summary table follows.
Table 1 — Panel anatomy
| Zone | Component(s) | Construction notes |
|---|---|---|
| Music rack | Single veneered frame; locates on two fixed pegs or a bracket above the upper manual | Detachable without tools on most units; approximately 2 pegs or screws (est.) |
| Top rail / lid | Veneered panel spanning the full width; drawbar rail and tablet hardware mounted on top surface | Amp/preamp access panels underneath; discharge B+ before opening |
| Fallboard | Hinged veneered panel that folds down over the upper-manual keybed when the instrument is closed | Hinge pins and a felted lower edge; cosmetically prominent |
| Upper manual surround | Front rail and cheek flanges framing the 61-note Swell manual keybed | Part of the main cabinet box; not removable as a standalone panel |
| Lower manual surround | Front rail and cheek flanges framing the 61-note Great manual keybed | Part of the main cabinet box |
| Knee / toe rail | Lower horizontal rail below the Great manual; carries the expression-pedal track opening | Structural; spans full width between side cheeks |
| Kick panel / toe board | Lower front panel below the knee rail, above the pedalboard opening | Frequently scuffed by shoes; often the worst-condition surface on an unrestored console |
| Side cheeks | Left and right end panels, full height of the console box | Primary veneer surfaces and the most visually prominent restoration targets |
| Legs ×4 | Turned wooden legs, two front and two rear; mortised or bracketed into the lower console frame | Solid wood, not veneered; finish must visually match the veneered panels |
| Leg stretchers | Cross-braces connecting leg pairs | Structural; may carry decorative shaping |
| Organist’s bench | Matching veneered lid over a wood box base; four turned legs or sled base | Stores under the rear of the console; lid is the cosmetically prominent surface |
12.1.2 Cabinet materials — veneer species and original finish (est.)
The B-3 was produced from 1954 to 1975, and Hammond offered the instrument in declared finish options including walnut and oak over the production run (organforum.com, Hammond cabinet restoration threads; goffprof.com, B-3 restoration reference). The exact veneer species, stain formulation, and topcoat chemistry applied to any individual console across a twenty-one-year production run are not definitively documented in publicly available Hammond service literature. All material identifications below are (est.) and must be confirmed on the specific unit before committing to stain or topcoat decisions.
- Veneer species: walnut veneer is the most commonly identified substrate in the B-3 restoration community; consoles described as “oak finish” may carry oak veneer or may be walnut veneer carrying a tinted topcoat of a different hue. Black walnut (Juglans nigra) was a common American furniture-veneer species of the period and is the most probable identification on North American production units (est.).
- Original topcoat: American musical instrument and furniture manufacturers of the 1950s–1970s commonly used nitrocellulose lacquer as a production topcoat (general period furniture and instrument manufacturing practice; organforum.com community discussions). That Hammond specifically used nitrocellulose lacquer on B-3 cabinets is (est.) — consistent with period practice but not confirmed by a factory specification document in the literature consulted for this volume. A solubility test (§“Assess: revive vs refinish — Inspection procedure”, step 4) will identify the finish type on any specific console.
- Grain characteristic: both walnut and oak are open-pored woods. Grain filling is required before a level topcoat can be applied (§“Stripping, staining & top-coat — Grain filling”).
Note: Do not attempt to match stain or topcoat without first identifying the veneer species and finish type on the specific console. The same stain product produces substantially different colour on walnut vs oak, and on an open vs filled grain structure. Confirm both before purchasing stain or finish.
12.1.3 Cabinet weight and gross dimensions
The B-3 console body on its leg set weighs approximately 310 lb (140 kg) (est.); the fully assembled instrument with the 25-note pedalboard approaches approximately 425 lb (193 kg) (est.) — figures and the full lifting/moving procedure are in Vol 06 §“Moving & lifting a console.” For cabinet work requiring access to both the exterior and the underside, remove the console from its legs per Vol 06 and rest the main box on padded sawhorses or a low rolling cart at a comfortable working height, approximately 760–910 mm (30–36 in) from the floor.
12.1.4 Structural vs cosmetic
Identifying which parts are structural (load-bearing or mechanically active) and which are cosmetic determines the risk of any restoration intervention:
- Structural / mechanically active: the console frame (the four corner posts of the main box and the leg-to-frame joint hardware). Any damage here must be repaired before cosmetic work begins.
- Cosmetically prominent, electrically neutral: the side cheeks, the fallboard, the music rack, the kick panel, and the organist’s bench lid. These are the primary refinishing targets and can be treated as furniture.
- Hybrid: the knee/toe rail (carries the expression-pedal track) and the top rail (carries drawbar and tablet hardware). Both can be refinished, but all mechanical attachments must be correctly re-engaged on reinstallation.
Warn: Never lift the Hammond B-3 console by the fallboard, the music rack, the drawbar rail, or the manual surround panels. These are not structural members and will crack, distort, or separate from the console frame under the instrument’s weight. Lift only from the solid wood sides or the underframe rails (organforum.com; Vol 06 §“Procedure — moving a B-3 console”). Two people are required for any lift or move.
12.2 Assess: revive vs refinish
The most consequential decision in a cabinet restoration is whether to revive the existing finish or strip and refinish. Stripping is irreversible and carries the risk of damaging or thinning the veneer beneath. A finish in better condition than it appears can often be revived in a few hours; stripping and refinishing the same console may require several days of work, controlled drying conditions, and specialised consumables. Assess before acting.
12.2.1 Inspection procedure
Tools: LED work light (gooseneck or panel, for raking illumination), clean lint-free cloths, naphtha (mineral spirits) in a small container, lacquer thinner in a small container (use with adequate ventilation), small artist’s brushes or cotton swabs, sharp pencil and notepad.
- Clean the surface first. Wipe each panel with a slightly damp cloth to remove surface dust and loose grime. Allow to dry completely (30 min minimum). Do not apply any oil, polish, or solvent at this stage.
- Rake with the work light. Hold the LED at a very low angle (approximately 5 ° to the surface plane). Scratches, dents, crazing, checking, and film delamination appear dramatically under raking light and are invisible under overhead illumination.
- Assess film integrity. Note whether any finish is actively lifting, cracking, or delaminating from the veneer. A finish that is lifting has lost its adhesion bond; a finish that is merely dull or lightly scratched still has its mechanical bond intact.
- Test the finish chemistry. In a small (approximately 6 mm / 1/4 in diameter) inconspicuous spot — the underside of the music rack or inside a leg bracket recess — apply one small drop of naphtha on a cotton swab and observe for 30 s. If the finish softens and smears, it is likely an oil or wax finish. If it resists, apply a drop of lacquer thinner and observe: softening under lacquer thinner suggests nitrocellulose lacquer (the most probable original finish, (est.)). No softening under either indicates a catalysed or conversion varnish. Record the result — it determines which subsequent products are compatible.
- Inspect the veneer. At each panel corner and edge, look for veneer that is lifting (a hump or gap at the edge), cracked (hairline split running with the grain), chipped (missing material), or checked (a network of fine cracks perpendicular to the grain, indicating dehydration or long-term finish failure). Probe any hump with a fingernail: a hump that flexes indicates a live blister; one that is rigid is settled delamination.
12.2.2 Condition grades and recommended path
Table 2 — Condition grades and recommended path
| Grade | Condition | Recommended path |
|---|---|---|
| A | Finish intact, reasonable sheen, minor surface scratches, no veneer damage | Revive only: clean, furniture restorer, paste wax |
| B | Finish dull, minor crazing, light surface wear, no veneer lifting or chips | Revive + light surface restoration: clean, 0000 steel wool, restorer, wax |
| C | Significant crazing, localised lifting or delamination, veneer repairs needed in 1–2 areas | Veneer repair (§“Veneer repair”), then targeted strip-and-recoat in affected areas; full strip if damage is distributed |
| D | Finish failing over large areas, extensive veneer damage (≥ 3 areas or large chips), heavy checking across multiple panels | Full strip and refinish per §“Stripping, staining & top-coat” — repair veneer first |
Warn: Do not strip a console in Grade A or B condition. Stripping removes the original finish irreversibly and eliminates the instrument’s historical patina. A properly revived Grade A original finish typically reads better than a new refinish on a 70-year-old instrument. The default should always be the most conservative treatment that achieves an acceptable result. See §“Keeping it original.”
12.2.3 The revive path (Grades A–B)
Consumables and tools: lint-free cloths (cotton flannel preferred), furniture restorer or reviver (e.g. Howard Restore-A-Finish, or a hand-mixed solution of equal parts boiled linseed oil and mineral spirits — a traditional oil-based surface treatment), 0000-grade steel wool (Grade B only), carnauba paste wax, soft buffing cloth.
Warn: Boiled linseed oil (and BLO/mineral-spirits mixes) on rags can self-heat and spontaneously ignite. Never ball up or bin used cloths. Lay them flat outdoors to dry fully, or submerge them in water in a sealed metal container, before disposal. (OSHA; NFPA; standard finishing practice.)
- Clean the surface with a slightly damp cloth. Allow to dry completely (30 min minimum).
- (Grade B only) 0000 steel-wool pass: lightly scuff the surface in the direction of the grain using 0000-grade steel wool on a flat backing block. This grade produces a micro-abrasion that removes surface oxidation without cutting through the finish film. Collect all steel-wool particles with a tack cloth before proceeding — steel particles left on wood can cause rust staining.
- Apply the furniture restorer per its manufacturer’s directions, one panel at a time, with a lint-free cloth and with-the-grain strokes. The solvent in a restorer-type product temporarily amalgamates the surface of a nitrocellulose finish, flowing into fine scratches and evening the sheen.
- Allow to flash off (15–30 min at approximately 20 °C / 68 °F). Wipe with a clean cloth.
- Apply one thin coat of carnauba paste wax (e.g. Johnson Paste Wax or equivalent). Allow to haze (15–30 min), then buff to a uniform sheen with a clean, soft cloth.
12.3 Veneer repair
Veneer repairs must be completed before any stripping, sanding, or top-coating. Attempting to sand or strip over a lifting edge propagates the damage; top-coating over an unrepaired chip leaves a visible recess under even multiple fill coats.
Three failure modes appear on B-3 consoles, each with a distinct procedure:
- Lifting or delaminated edge — the veneer has lost adhesion at an edge or seam and is partly separating from the substrate.
- Live blister — a subsurface bubble under an otherwise intact veneer surface.
- Chipped or missing veneer — a section has broken away, leaving the substrate exposed.
12.3.1 Procedure A — Lifting / delaminated edge
Tools: palette knife or thin putty knife; PVA glue (white or yellow woodworking glue) or hide glue; syringe applicator (optional); waxed paper; flat caul block (hardwood or MDF, minimum 150 mm / 6 in span); minimum 4 bar clamps or hand-screw clamps; clean cloths; warm water.
Warn: Do not force a lifting veneer flat without adhesive — dry clamping will crack veneer across short-grain sections at panel corners. Always inject adhesive before applying clamp pressure, and always place a waxed-paper layer between the caul and the veneer to prevent the caul bonding to the newly glued surface.
- Mask adjacent areas with painter’s tape set back approximately 25 mm (1 in) from the lifting edge.
- Gently lift the veneer with the palette knife to the extent of the loose area. Do not force past what lifts freely — propagating a crack is worse than leaving a small section un-pressed.
- Clean the substrate. Remove old dried adhesive from the substrate and the veneer underside using a damp cloth. Allow to dry fully (30 min). Old PVA failure typically cleans away easily; old hide-glue failure may need a little warm water to soften before scraping.
- Apply adhesive. Work a thin, even coat of PVA glue (or fresh hide glue, heated to approximately 60 °C / 140 °F and applied immediately) onto both the substrate face and the veneer underside. A syringe applicator introduces glue into very narrow gaps without further lifting the veneer.
- Press the veneer down and work any air pockets toward the open edge using a soft cloth. Wipe away squeeze-out immediately with a slightly damp cloth.
- Apply the caul and clamps. Lay waxed paper over the repair, then the caul block, then apply clamp pressure. The caul must span at least 25 mm (1 in) beyond the repair in every direction. Clamp to hand-firm pressure — sufficient to squeeze out excess adhesive but not aggressive enough to crack the veneer. Where clamps cannot reach (e.g. mid-panel on the fallboard), use flat weights or a veneer bag.
- Cure time. PVA glue: clamp minimum 60 min; full cure 24 h at approximately 20 °C (68 °F) before any sanding or finishing. Hide glue: clamp 60 min; full glue strength in 2–4 h, though a full 24 h rest before sanding is preferred.
- After cure: remove tape; clean adhesive residue with a damp cloth and allow to dry. Proceed to sanding and top-coating per §“Stripping, staining & top-coat.”
12.3.2 Procedure B — Live blister
Tools: thin craft knife or scalpel, syringe applicator, PVA glue, waxed paper, caul, clamps (as Procedure A).
Warn: When slitting a live blister, always cut along the grain — a cross-grain cut tears the veneer and turns a simple repair into a patch.
- Confirm the blister is live by pressing gently at its edge — a live blister springs back; a settled, dried blister is rigid.
- Slit the blister. Using a sharp craft knife, make a single cut running with the grain (never across the grain — a cross-grain cut tears the veneer) through the centre of the blister, penetrating only the veneer, not the substrate.
- Inject adhesive. Use a syringe or fine brush to work a small amount of PVA glue under both sides of the blister through the slit.
- Press, caul, and clamp per Procedure A, steps 5–7.
- After full cure (24 h), use 180-grit sandpaper and a sanding block to level the slit line, which will be slightly proud due to squeeze-out. Sand only with the grain.
12.3.3 Procedure C — Chipped or missing veneer (patch repair)
Tools: donor veneer piece (see Note below); craft knife and metal straightedge; PVA glue; syringe; waxed paper; caul; clamps; 80-grit, 120-grit, 180-grit, and 220-grit sandpaper; sanding block; matching stain; sharp pencil.
Note on donor veneer: The ideal source is a salvage piece of the same veneer from a non-visible surface of the same console — the underside of a panel section or inside a bracket recess. If unavailable, veneer specialty suppliers stock thin-sliced walnut and open-grain oak veneer in small quantities. Species match takes priority over figure match; correct species plus stain matching can produce an inconspicuous repair even without identical figure (est. — patch match quality varies with grain complexity).
Warn: Veneer patch repairs are visible to a careful eye. The goal is an inconspicuous repair — grain-aligned, stain-matched, sanded flush — not an invisible one. An inconspicuous patch on a side cheek is far preferable to an unfinished substrate area.
- Cut the patch to a diamond or angled-end shape with cuts at approximately 30 ° to the long axis of the grain. Angled ends are less visible than rectangular ends because the eye follows the seam into the surrounding grain. Cut the patch 3 mm (1/8 in) oversized on all edges.
- Template the substrate. Place the donor patch over the damaged area and trace its exact shape with a sharp pencil. Using the craft knife and straightedge, cut through the remaining damaged veneer on the traced line to produce a clean-edged recess matching the patch shape.
- Dry-fit the patch. Place the patch without adhesive; it should close without a gap on all edges and the grain should run in the same direction as the surrounding veneer. Trim as needed.
- Glue, clamp, and cure per Procedure A, steps 4–7.
- Sand flush. After full cure (24 h), sand the patch flush with a sanding block. Start with 80-grit if the patch is proud, progressing through 120-grit then 180-grit to level. Do not sand more than necessary — excessive sanding thins veneer dangerously and risks cutting through to the substrate.
- Stain the patch to match the surrounding surface per §“Stain matching.” Always test the stain on an offcut from the same donor veneer before applying to the panel.
12.4 Stripping, staining & top-coat
Stripping is appropriate when the finish is failing over large areas (Grade D; occasionally Grade C where damage is widespread across multiple panels). Veneer repairs must be completed before stripping begins. The decision to strip commits the restoration path irreversibly — see §“Keeping it original.”
12.4.1 Stripping
Consumables and tools: chemical stripper (methylene-chloride-free formulation recommended for safety — e.g. Citristrip or a soy-gel product; or traditional methylene chloride stripper where the workspace has Class 2 solvent ventilation); wide (75–100 mm / 3–4 in) natural-bristle brush; plastic scrapers (not metal — metal scrapers gouge veneered surfaces); 0000-grade steel wool; naphtha for neutralisation; lint-free cloths; nitrile gloves; chemical-resistant goggles; organic-vapour respirator (NIOSH-rated OV cartridge for methylene chloride products; N95 with local exhaust for low-VOC products).
Warn: Chemical strippers are skin and eye irritants; methylene chloride (dichloromethane) is classified as a probable human carcinogen and is acutely toxic in poorly ventilated spaces. Any stripping work must be performed with nitrile gloves, chemical-resistant goggles, adequate ventilation, and a respirator rated for the specific product. Work outdoors or in a spray booth with forced exhaust — not in a closed room. Read the stripper product’s SDS before use.
- Remove all hardware before stripping — music rack, support pegs, all visible screws, hinges, and any metal hardware from the panels being stripped. Bag and label all fasteners by location.
- Apply stripper to one panel at a time in a thick, even coat per the product directions. Low-VOC soy/citrus strippers typically require 30–60 min dwell time. Methylene chloride strippers act faster (15–20 min) but must not be allowed to dry on the surface — work in smaller sections if ambient temperature exceeds 21 °C (70 °F).
- Test for lift. When the finish wrinkles and a plastic scraper can lift a sample off cleanly, the dwell is complete.
- Remove the finish with the plastic scraper, pulling with the grain. Collect all stripped material in a labelled waste container.
- Re-apply stripper to any areas where finish remains. Most original finishes require 2–3 applications to strip completely (est. — depends on the number of original coats).
- Neutralise the surface. Wipe the panel with a cloth dampened with naphtha to remove stripper residue. Allow to dry (1 h minimum). Some soy/citrus products require a water-wash before the naphtha wipe — follow the specific product’s directions.
- Final pass with 0000 steel wool in the direction of the grain to remove any last finish traces from open pores. Remove all steel-wool particles with a tack cloth.
- Inspect the bare veneer under raking light. Note any damage revealed by stripping. Execute additional Procedure A or B veneer repairs as required before proceeding.
12.4.2 Sanding the bare surface
Tools: sanding block (flat hardwood or cork); sandpaper: 120-grit, 150-grit, 180-grit, 220-grit. All sanding is in the direction of the grain — no exceptions.
Warn: Sanding across the grain on a veneered surface produces visible scratches that are extremely difficult to remove without thinning the veneer dangerously. Every sanding pass — with every grit — must run parallel to the grain.
- 120-grit pass: flatten raised grain and level any minor stripper residue or adhesive from veneer repairs. Use a firm backing block.
- 150-grit pass: remove the 120-grit scratches. Wipe frequently with a tack cloth and check under raking light.
- 180-grit pass: refine the surface to a consistent pre-grain-fill texture.
- Tack cloth the entire surface before grain filling.
12.4.3 Grain filling
Open-pored woods — walnut and oak, both probable B-3 veneer species (est.) — require grain filling before a level topcoat can be applied. Without filling, each pore appears as a small depression under the topcoat, visible as a texture pattern called pore show-through, which is especially noticeable under a gloss or semi-gloss finish.
Consumables: oil-based paste grain filler (e.g. Behlen Pore-O-Pac or equivalent), tinted to approximate the intended final colour or used neutral if staining after filling; lint-free cloths.
- Apply the grain filler with a stiff brush or bare palm, working across the grain to pack filler into the open pores.
- Wipe across the grain with a clean cloth to remove surface filler while leaving pores packed. Finish with a light cross-grain wipe.
- Allow to cure per the product directions (typically 2–4 h; the surface should feel dry and resist a fingernail scratch when cure is complete).
- 220-grit pass: lightly sand the filled surface with 220-grit and a sanding block, with the grain, to remove the surface skin of filler while leaving the pores filled. Wipe with a tack cloth.
- Inspect under raking light. If pores remain clearly open, repeat the fill cycle. Two fill passes is typical for coarse-grain walnut (est.); fine-grain walnut or oak may fill in one pass.
12.4.4 Stain matching
Stain matching is the most judgment-dependent step in a full refinish. The goal is to match the tone of panels that were not stripped (legs, music rack) or to reproduce the original Hammond finish colour from a reference sample.
Consumables: candidate stain samples (oil-based wiping stains are preferred for open-grain wood; water-based stains may raise grain and require an additional 220-grit pass after drying); offcuts from donor veneer (for test samples); lint-free cloths.
Warn: Never apply a stain to a panel without testing it first on a scrap piece of the same veneer species, prepared identically — grain-filled and sanded to the same grit. Stain colour shifts significantly between wet application and final drying, and shifts further under the topcoat. Dry the test sample and apply a sample coat of the intended topcoat before comparing it to the reference panel. Conduct the comparison under natural daylight — incandescent or fluorescent light shifts apparent colour substantially and can produce a misleading result.
- Select a base stain matching the overall tone — warm brown for walnut, golden to grey-brown for oak (est.).
- Apply the stain to a test sample per the product directions: wipe on with a lint-free cloth; allow 3–5 min penetration; wipe off excess. Allow to dry fully (2 h minimum for oil-based; 30–60 min for water-based).
- Apply a test coat of the intended topcoat to the dried sample. Allow to cure. Compare to the reference surface under natural daylight.
- Adjust the mix by adding a complementary toner (e.g. a small amount of dark brown to deepen a stain that reads too orange; raw umber to cool a stain that reads too red) until the test sample matches the reference.
- Apply the matched stain to the panel per the product directions. Allow to dry completely before applying topcoat.
12.4.5 Top-coat options
Table 3 — Top-coat options
| Top-coat | Application | Time between coats | Full cure | Appearance | Restoration notes |
|---|---|---|---|---|---|
| Nitrocellulose (NC) lacquer | Spray (preferred) or aerosol | 30–45 min at 20 °C (68 °F) | 72 h minimum; 7 days before full use | Satin to gloss; ages to warm amber | Most likely period-authentic choice (est.); re-amalgamates for future touch-up; flammable solvent — see Warn below |
| Wiping varnish / Danish oil | Wipe-on; lint-free cloth | 4–8 h | 7–10 days | Low-lustre; penetrating (no film build) | Easiest application; no spray required; must be re-applied periodically (annually); best for a matte natural look |
| Wipe-on polyurethane | Wipe-on; self-levelling | 2–4 h at 20 °C (68 °F) | 7 days full | Satin to semi-gloss | More durable than oil; no spray needed; future touch-ups require full sand-back and recoat (does not re-amalgamate) |
| Water-based polyurethane | Brush or spray | 2 h at 20 °C (68 °F) | 24 h between coats; 7 days full | Clear-toned (non-yellowing) satin to gloss | Non-flammable; may read slightly cool on dark walnut; do not apply below 13 °C (55 °F) |
12.4.6 Finishing procedure — numbered steps (NC lacquer, the most likely period-authentic choice, (est.))
Consumables and tools: NC lacquer (aerosol spray cans or spray-gun application); 220-grit and 320-grit sandpaper; sanding block; tack cloths; lint-free cloths.
Warn: NC lacquer solvent vapour is flammable and must not be applied near any ignition source — open flames, pilot lights, spark-producing electrical outlets, or running motors. Apply only in a well-ventilated spray area with forced exhaust. The vapour is also a respiratory irritant; use an organic-vapour respirator. Do not apply NC lacquer at temperatures below 13 °C (55 °F) or above 32 °C (90 °F), or at relative humidity above 65 % — cold causes blushing (white haze) in the film; high humidity traps moisture under the film. Optimal application conditions: 18–27 °C (65–80 °F), relative humidity below 65 %.
- Seal coat. Apply a light mist coat of NC lacquer at approximately 300 mm (12 in) spray distance, one panel at a time, working in the grain direction where possible. This seal coat locks the stain and reveals any areas that need further levelling.
- Flash off completely — 30–45 min at 18–27 °C (65–80 °F). Do not stack wet coats.
- 220-grit scuff sand. Lightly sand with 220-grit and a backing block to knock down dust nibs and raised grain. The surface should be uniformly dull after sanding. Wipe with a tack cloth.
- Second coat (slightly heavier than the seal coat; aim for a wet, self-levelling film). Allow 30–45 min flash-off.
- 320-grit scuff sand. Repeat with 320-grit. Wipe with tack cloth.
- Third coat (final build coat for most applications). Allow full 72 h cure at 18–27 °C (65–80 °F) before use, handling, or hardware reinstallation.
- Optional rub-out. After the full 72 h cure, rub out the final coat with 0000-grade steel wool (for satin) or a rubbing compound (for semi-gloss to gloss) to achieve a uniform, even sheen. Finish with a coat of carnauba paste wax if desired.
Note: For wipe-on poly or water-based finishes, substitute the product’s specified drying and cure times at steps 2, 4, and 6. The grit progression and procedure logic remain the same.
12.5 Hardware & the bench
Hardware restoration is the final step before reassembly and return to service. The B-3 carries several hardware items that are mechanically simple but historically irreplaceable — many original fixtures are no longer in production, and sourcing exact replacements is difficult.
12.5.1 Music rack
The music rack is a veneered frame that locates above the upper manual on two pegs or a bracket and holds sheet music or other material during performance.
Tools: flathead or Phillips screwdriver (check size before applying force); masking tape; wood blocks for panel support.
- Remove the rack by lifting it free of its support pegs, or by removing the retention screws if it is screwed in position. Note the exact orientation and the position of any bushings, spacers, or felts between the rack and the console body.
- Inspect and finish the rack as a separate panel following the assessment and revive or strip-and-refinish procedure appropriate to its condition grade. The rack is often in better condition than the main panels (less handling, less UV exposure) and may require only a Grade A revive even when the side cheeks warrant a Grade C or D treatment.
- Inspect the support pegs or bracket. Pegs that are loose or cracked should be re-glued (Procedure A) or replaced with matching wooden dowels. Felted contact points that are compressed or deteriorated should be replaced with fresh felt (adhesive-backed craft felt, approximately 2 mm (1/16 in) thick).
- Reinstall the rack after all finish work on the main console panels is completed and fully cured — 72 h minimum after the final topcoat. Do not scratch newly finished panels with the rack hardware during reinstallation.
12.5.2 Amp/preamp access covers
The top surface of the B-3 console includes one or more removable access panels that provide entry to the AO-28 preamp chassis and the console power supply beneath the top rail. These panels are part of the top cosmetic surface and are finished to match the main cabinet.
Warn: The AO-28 and console power supply are located immediately beneath these access panels. The panels must not be removed while the instrument is powered or before the B+ has been discharged. Before lifting any access panel, confirm the instrument is unplugged and the B+ has been discharged and verified at 0 VDC per Vol 06 §“Capacitor-discharge procedure.” Finish the access panels as separate pieces removed from the console — this also avoids any risk of finish overspray or solvent contact with the internal electronics.
- Remove the access panels (typically 2–4 screws per panel; locate all screws before lifting — some may be recessed under the drawbar rail).
- Finish the panels on the bench as separate pieces, following the same assessment and treatment procedure as the main panels.
- Reinstall with all original screws in their original positions. Tighten to snug — finger-tight plus 1/4 turn — and no further. Over-tightening steel screws into veneered wood panels strips the thread recess.
12.5.3 Kick panel
The kick panel (toe board) is the lower front panel below the knee rail, directly above the pedalboard opening. It is exposed to shoe contact during performance and is commonly the worst-condition surface on an unrestored console.
- Remove the kick panel if it is a detachable piece (on many B-3 consoles it is screwed or tabbed from the interior side). Support it from below as it releases.
- Finish the kick panel as a separate piece. It often warrants a full strip-and-refinish even when the rest of the cabinet is Grade B; finishing it off the instrument avoids awkward reach and reduces the risk of finish contact with the pedalboard or expression pedal hardware.
- Reinstall after finish is fully cured (72 h minimum for NC lacquer).
12.5.4 Fasteners — de-rusting and replacement
Original fasteners are typically mild steel and may be corroded after decades in variable humidity.
Tools: wire brush, phosphoric-acid rust converter (e.g. naval jelly), penetrating oil (e.g. PB Blaster or equivalent), small container of replacement screws (matched by head type, drive type, diameter in mm, and thread pitch).
Warn: Do not substitute mismatched screws in positions where the fastener engages an internal bracket, a metal thread insert, or a load-bearing joint. The original fastener dimensions govern the engagement depth; a longer screw can penetrate into the electronics cavity; a shorter one will not grip. Measure the original before sourcing a replacement.
- Remove and bag all fasteners by location before finishing the panels they retain.
- Assess each fastener. Light surface rust: clean with a wire brush; treat with phosphoric-acid rust converter per product directions (10–15 min dwell); wipe clean and dry. Moderate rust: soak overnight in penetrating oil, then clean and treat. Severely rusted or stripped-head fasteners: replace with an exact-dimension substitute.
- Reinstall screws finger-tight plus 1/4 turn for wood screws into veneered panels; to manufacturer torque spec (or snug) for machine screws into brass inserts.
12.5.5 Organist’s bench
The organist’s bench typically matches the main cabinet finish and comprises a veneered lid over a wood box, on four turned legs (matching the console legs) or a sled base.
- Assess the lid veneer using the same five-step procedure in §“Assess: revive vs refinish — Inspection procedure.” The lid receives more direct UV and handling exposure than the console sides and may grade one level worse.
- Check leg joints or the sled base. Re-glue any loose joints with PVA or hide glue; clamp and cure 24 h before refinishing — a finished surface must not flex.
- Refinish the lid following the same procedure as the main panels and using the same batch of stain and topcoat where possible. Finishing the bench at the same time as the console, from a single mixed stain batch, produces the best colour match.
Warn: The bench lid hinge (where the lid is hinged for storage access) is a mechanical component. Mask all hinge pivot points before applying any finish. After refinishing, test that the lid opens and closes freely — finish build-up at the hinge joint can cause binding that splits the veneer at the hinge line if the lid is forced.
12.6 Keeping it original
The standard-cabinet restoration documented in this volume is grounded in a conservative, reversibility-first ethic: do the least that achieves an acceptable result; preserve as much of the original surface as possible; treat every irreversible action — stripping, patching, drilling, cutting — as a last resort rather than a default starting point.
The B-3 is a 50–70-year-old working instrument. An original factory finish, however worn, is historically authentic and cannot be exactly reproduced after removal. The finish’s patina, the stain depth, and the specific character of a period nitrocellulose lacquer are characteristics of original manufacture; a new refinish — even a skilled one — will read as a refinish to a knowledgeable eye. This parallels the well-established “original finish” ethic for vintage guitars and other musical instruments: a well-preserved original finish holds historical value and authenticity that a quality new finish cannot replace (general vintage instrument restoration practice; organforum.com community discussions on “keep it original” vs strip decisions).
The decision framework:
Table 4 — The decision framework
| Condition | Decision |
|---|---|
| Grade A (finish intact, minor scratches) | Revive only. Do not strip. |
| Grade B (dull, minor crazing, no veneer damage) | Revive + light surface work. Strip only if a genuine revive attempt fails to produce an acceptable result. |
| Grade C (localised damage, 1–2 veneer repairs needed) | Targeted veneer repair; targeted recoat in affected areas. Full strip only if damage is distributed across multiple panels. |
| Grade D (finish failing throughout, major veneer damage) | Full strip and refinish. The original finish is no longer worth preserving. Execute with veneer care. |
| Veneer substrate irreparably damaged or cabinet structurally compromised | Consider whether standard restoration is the right path at all — see Vol 13 §“Chopping a B-3: Planning & Philosophy.” |
Warn: The decision to strip a Grade A or B original finish is irreversible. The decision to chop the cabinet (Vols 13–15) is equally irreversible: a chopped console cannot be returned to a standard cabinet. Both decisions deserve the same deliberation as any other permanent modification to a seven-decade-old instrument. The default posture is “do less” — the exceptions (Grade D finish, genuine structural failure) are recognisable without ambiguity. When in genuine doubt, a revive attempt is always the right first move.
12.6.1 The alternative path: the chop (Vols 13–15)
When the original B-3 cabinet is irreparably damaged, too heavy for a specific use scenario, or simply wrong for the application, the alternative path is the chop: disassembling the console, extracting the generator, manual assemblies, and amplifier, and rehousing them in a compact portable enclosure. This is a widely practised and legitimate approach in the organ restoration and performing community; it can give a mechanically sound instrument a productive working life when the original cabinet cannot be saved or is not appropriate to the use case.
The governing ethic of the chop mirrors the governing ethic of this volume: do not chop a clean one. A B-3 in Grade A or B original cabinet condition is worth preserving as a full console. A B-3 with a cracked or rotted cabinet frame, failed veneer substrate across multiple panels, or broken structural leg joints is a legitimate chop candidate. The planning framework and the “don’t chop a clean one” decision structure are in Vol 13 §“Chopping a B-3: Planning & Philosophy.”
All restoration and build outcomes — standard cabinet restore, chopped portable build, or a hybrid approach — are recorded in the photographic build gallery in Vol 16.
Sources consulted: organforum.com (Hammond B-3 restoration and cabinet discussion threads — finish options, veneer repair practice, “don’t strip a clean one” community ethic; general community knowledge across multiple threads); goffprof.com (GOFF Professional, general B-3 restoration reference); dairiki.org / HammondWiki (B-3 console classification and open bench vs church cabinet distinction — Vol 01 cross-reference); general furniture-finishing and veneer-repair practice (cited as such throughout for veneer procedures, grain filling, stain matching, and topcoat application — these are standard woodworking practices, not Hammond-specific claims; sources include Fine Woodworking and general cabinet/instrument restoration practice). Hammond-specific finish chemistry (nitrocellulose lacquer) and veneer species (walnut, oak) are flagged (est.) throughout because no factory specification document confirming these particulars was located in the period literature consulted; they represent the consensus of the restoration community and are consistent with broad American instrument and furniture manufacturing practice of 1954–1975. Stain adjustment ratios, grit progressions, and cure times are general woodworking practice and carry no Hammond-specific claim. Cross-references: Vol 01 §“Lineage & the tonewheel console family” (B-3 vs C-3 cabinet distinction; console model table); Vol 06 §“Moving & lifting a console” (console weight ≈ 425 lb / 193 kg est. fully assembled; leg-set weight ≈ 310 lb / 140 kg est.; lifting procedure and two-person requirement); Vol 13 (chopping a B-3 — planning and the alternative path to the standard restore); Vol 16 (build-record gallery — standard and chopped builds); Vol 18 (reference cheatsheet and bibliography).
Comments (0)